Showing posts with label Family Home Evening. Show all posts

Playtime Hearts


I recently had our 4th child, and we also recently moved.
I've been busy and tired and we are trying to find our new rhythm.....
and I'm trying not to lose my marbles. :)

The kids seem to be acting up a little bit more lately, and I've been praying & asking for help and guidance as a Mother.
The answer that keeps coming back to me is to spend more time with my kids.
Because when all is said and done, I know that is what really matters to me.


So I came up with an idea to help make that happen:
PLAYTIME HEARTS.

Here's what I did:

1. I traced heart shapes onto yellow paper and cut them out. They are roughly 2 1/2 inches big. I cut out about 26 hearts.


2. I wrote on each heart a fun activity that I know the kids like to play. 
A lot of these are things they've asked me to play with them in the past......the ones where I have given the all-too-often response of "not now."
I came up with these myself, but it would be fun to sit down with your kids and think of fun things to do together. 


Here's a list of what we've got:

Cars
Airplanes
Legos
Color
Dance
Trains
Super Heroes
Paper Airplanes
Play Library
Wii
Game (3 of these. We have a lot of games)
Soccer Outside
Catch Outside
Ninja Turtles
Mazes
Make no-bake cookies
Little People
*Your Choice (2 of these)

(I also left a few hearts blank so I could add things later that we think of to play).


3. I taped them onto the little chalkboard we have hanging up in our kitchen (You could tape them up anywhere).


4. And from here it's easy! I let the kids take turns picking a heart and we do whatever is on the heart, together. Sometimes there is a time limit (20-30 minutes depending on what's going on that day) and sometimes we just play and I try to just forget the time and focus on my kids. It's been refreshing to remember what it's like to play as a kid. It's good for all of us. :)


Some days are busy and we don't pick any hearts.
Some days are wide open and each of the kids get a chance to pick a heart.
Sometimes it's when my oldest is at school and it's just me and the little ones.
Sometimes it's all of us together as a family, including Daddy.
This week we used one of the hearts as our activity for Family Home Evening.
And sometimes we play without picking a heart at all. :)

When all the hearts have been picked, I'll tape them back up and start again.


This idea was a direct answer to my prayers.
We've done it for the past week, and it has been so much FUN!
It's helped us all in so many ways. The kids seem to not be acting up quite as much. I've noticed so many wonderful qualities in my children when we sit and play together---because I'm actually paying attention to them! Something I needed to be reminded to do.

But most of all it's helped me make the time for what truly matters to me--matters more than anything and everything.

My family.


We are a participant in the Amazon Services LLC Associates Program, an affiliate advertising program designed to provide a means for us to earn fees by linking to Amazon.com and affiliated sites.

FHE: Be a good example


Here is a quick and easy Family Home Evening lesson you can whip up in a snap.
We live far away from Grandparents so we going to try to facetime them once a month and have an FHE together. We did this one last week and it was a success!
(This would also be a fun and easy Primary or Nursery lesson.)

Supplies:

Prep Work:
  1. Cut strips out of the yellow paper.
  2. Cut a big circle out of the orange paper.


3. On the orange circle, write these words from the scripture Matthew 5:16: "Let your light so shine!"


Lesson Time!

  1. With your family, read Matthew 5:16 (You can even work on memorizing it if you want!)
  2. Tape up the orange circle on the wall.
  3. Hand each person 1 or 2 yellow paper strips and have them each think of ways they can let their light shine, and be a good example of Christ to others.
  4. Then one by one, tape the yellow strips on the wall all around the orange circle:


5. Ask your children what they see now. Answer: The SUN! Talk about how when we do good things and try to be a good example, it shines like the sun. Other people will notice it and will be blessed as we live as our Heavenly Father and Savior want us to. And we will be happy. :)


Do you like this idea?


We are a participant in the Amazon Services LLC Associates Program, an affiliate advertising program designed to provide a means for us to earn fees by linking to Amazon.com and affiliated sites

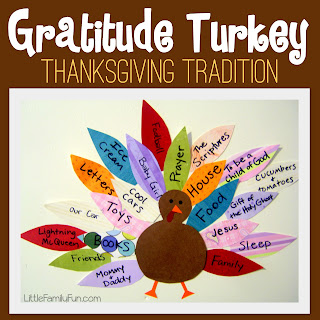
Gratitude Turkey 2013


Last week we started our traditional Gratitude Turkey!
Every year in November, I make a turkey body and stick it to the wall. Then I cut out a bunch of feathers and put them in a bowl or a bag with a marker, near the turkey.

When we think of something we're thankful for during the month, we write it on a feather and add it to the turkey! (We stick them to the wall with sticky-tack)

It's so fun to watch our turkey grow and grow throughout the month as we think of the MANY blessings we have in our lives.


Here are the posts about our turkeys from years past:

http://www.littlefamilyfun.com/2012/11/gratitude-turkey-2012-thanksgiving.html


http://www.littlefamilyfun.com/2011/11/gratitude-turkey-2011.html


http://www.littlefamilyfun.com/2010/11/gratitude-turkey.html


Compliment Hearts - Family Activity


Here is a fun activity we did for Family Home Evening a while ago. This has been one of my favorites! It's super easy and was really fun & uplifting to think about all the things we love about each other. :)

Here's what you do:
  • Cut 3 hearts out of different colors of felt OR paper.
  • Put each persons name in a hat and have everyone draw someone's name.
  • Have someone stand on one of the felt hearts, and the person that drew their name says something nice about them.
    • We used the 3 colors of hearts like this:
      • Yellow - Say 1 thing that person does really well (ie. "He is really good at playing football.")
      • Pink - Say 1 thing you love about that person (ie. "I love how he makes me laugh.")
      • Blue - Say 1 thing you can do to show you love that person (ex: "I can share my trains with him.")
  • Then that person sits down and the next person stands on the hearts, and on until everyone has had a chance. 


This was so fun, and really cute to hear what nice things the kids thought to say. I want to do this again, and maybe even record it, or write down what everyone says. :) Because doesn't it just brighten your day when someone says something nice about you? 


Awww......shucks! :)


We are a participant in the Amazon Services LLC Associates Program, an affiliate advertising program designed to provide a means for us to earn fees by linking to Amazon.com and affiliated sites.

Teaching Family Values


This is the 2nd activity in our "Family Unity" theme. We did this for Family Home Evening to talk about how these core values can strengthen our family. 

These 9 values come from "The Family: A Proclamation to the World" where it states:

"Happiness in family life is most likely to be achieved when founded upon the teachings of the Lord Jesus Christ. Successful marriages and families are established and maintained on principles of faith, prayer, repentance, forgiveness, respect, love, compassion, work, and wholesome recreational activities."


Prep Work:
  • Cut a white piece of paper (or cardstock) into 6 rectangles. On each rectangle, write each letter of the word FAMILY.
  • Cut out 9 big triangles from different colors of construction paper. On each one, write each of the 9 values mentioned in the paragraph above: faith, prayer, repentance, forgiveness, respect, love, compassion, work, and wholesome recreational activities.


Here's what you do:
  • Sit down with your family and lay out all the papers you made. Tell them we are going to build a house. Have them put the letter rectangles in order to spell "family" (3 letters on top, 3 on bottom).
  • Then tell them there are 9 different roofs for the house that can help the house be strong---with words of things we can do to help our family be strong.
  • Have a child choose one roof at a time and put it on the house and talk about how your family can develop that value. For example: "What are some ways we can show that we LOVE each other?" 


  •  Do this with all the values. OR you can focus on 1 value each week or each month--and make 1 goal as a family for how you can implement that value into your lives.  


We are a participant in the Amazon Services LLC Associates Program, an affiliate advertising program designed to provide a means for us to earn fees by linking to Amazon.com and affiliated sites.

Family Balloon Games!


Our theme for this week and next is "Family Unity." 
The Thanksgiving season is time for family, and remembering how we cherish these relationships. So over the next few days, I'll be sharing some activities we've done as a family that have been FUN and have helped us become more unified. :)

This first activity is using balloons to play a few fun family games! 

Prep work:
  • Blow up the same number of balloons as people in your family.
  • With a permanent marker, draw each persons face on one of the balloons (or you can have each person draw their own face. OR each person draws someone else's face and everyone tries to guess who it is!) :)
There. Now you have your own little balloon family:


Games to play:
     (We have played the first 2 games and had lots of fun! Here are a few more ideas too!)

  • BALLOON BOUNCE: Get a BIG blanket or sheet and each person hold a corner or edge. Pull it out and hold it up--then place the balloon family on top. Everyone shake the blanket and watch the balloon family bounce all over the place! TRY to keep all the balloons on the blanket, but when a balloon falls off, everyone drop the blanket and go "rescue" that balloon. Whoever's face was on that balloon gets a big group hug! Then put all the balloons back on and play again! 
  • HIDE & SEEK 1:Take turns hiding all the balloons in a room for the rest of the family to find! (The boys (5&3) love playing hide and seek, so this was a VERY simple and fun way to use the balloons!)
  • HIDE & SEEK 2: Each person take their balloon face and go hide it somewhere in the house. When everyone's balloon is hid say "ready, set, go!" and everyone search for the balloons! (But you can't find your own balloon).
  • BALLOON LAVA: Stand in a circle and everyone throw the balloons up in the air. Do whatever you can to not let any of the balloon family land in the lava (touch the floor). 
    • ADVANCED: do the same thing, but lay on your backs and only use your feet to keep the balloons up in the air! :)
  • BALLOON SURPRISES: ***Before you blow up the balloons---cut up small pieces of paper and have each person write or draw something they love about each member of the family. Stuff the little papers into the balloon. THEN blow them up and draw the faces on them. One at a time, pop the balloons and read the sweet messages inside!


Got any more ideas? Share in the comments below! :)

We are a participant in the Amazon Services LLC Associates Program, an affiliate advertising program designed to provide a means for us to earn fees by linking to Amazon.com and affiliated sites.

Gratitude Turkey 2012 - Thanksgiving Tradition


It's that time of year again! Time for our traditional Gratitude Turkey! 
We started it during Family Home Evening this week as we talked about what it means to be grateful. It's also a perfect activity to go with our "Turkey" Preschool theme for the week.

**We've done this Thanksgiving tradition for the past few years. Here are links to the ones we've posted in the past:


Here's how we made this year's Turkey:
  • Using a piece of brown scrapbook paper (ours was polka-dotted), cut out 1 big cirlce and 1 smaller circle. (our circles were about 8" wide, and 4" wide). (p.s. Check out our post on an AMAZING deal for scrapbook paper packs on Amazon!)
  • Using orange craft foam, cut out a beak and 2 legs with feet.
  • Using red craft foam, cut out a red piece to be that funny thing under the turkey's beak.
  • Get out 2 big googly eyes.
  • On a piece of paper cut into a rectangle, write, "We are THANKFUL for......"
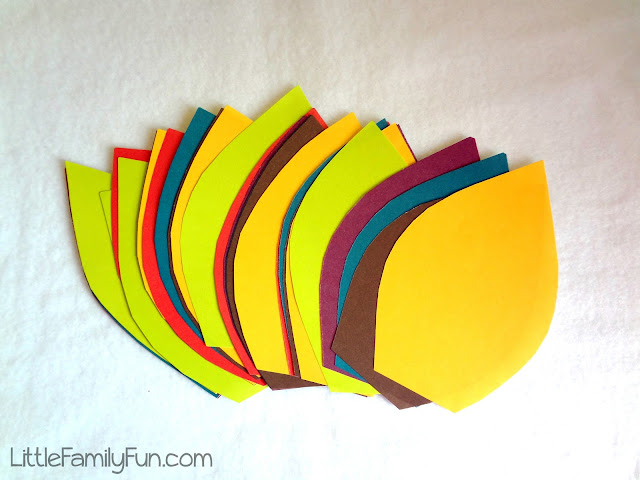
  • Using different colors of scrapbook paper, cut out fat feathers. 


(I stacked the papers on top of each other so I could cut 6 feathers at once. Saved a lot of time.) Keep in mind the feathers don't have to be perfectly shaped. You could draw the feathers on 1 piece then put it on top of all the other papers and cut them out. Or just cut haphazardly....like I did. :)
I cut 6 feathers out of each piece of 12x12 square scrapbook paper.
https://amzn.to/2uUznCh


  •  Then Glue all the turkey pieces together, like so........


Here's what you do:
  • Stick the turkey to the wall with tape or sticky-tack. (We put ours on the inside of our front door).
  • From now until Thanksgiving, whenever someone thinks of something they are thankful for (or each week for Family Home Evening), they will take a feather and write it down. We also decided to draw what it was on the feathers too. :) Then using tape or sticky tack, stick the feathers on the wall all around the turkey.


This is a fun tradition for our family. Like you, we are very blessed with many wonderful things in our lives--big & small. It's fun to spend time thinking about all our amazing blessings. 


We are a participant in the Amazon Services LLC Associates Program, an affiliate advertising program designed to provide a means for us to earn fees by linking to Amazon.com and affiliated sites.

Paper Pencil Goodie-Bag


So, before I made the felt Pencil Pouches to put surprises in for the kids, I made this pencil out of construction paper to fill with goodies. 

(And all of these Back-to-School "pencil" traditions to go along with the Pencil Cake I posted about yesterday)

Anyways, making the paper pencil was really easy, and you could easily fill it with goodies or notes or anything. :) 

Here's how to make one:
  • Roll up a piece of yellow construction paper and tape it together. (I just used scotch tape)
  • Cut out a pink strip of paper and roll it around the end of the pencil and tape it together. 
  • Cut out a white (or any color) small strip of paper and tape it around the pencil next to the eraser.
  • For the tip of the pencil:
    • cut out a circle with white paper (a circle bigger than the size of the pencil)
    • draw a big black circle in the center of the circle with marker or crayon (this is the lead)
    • Cut a slit into the circle from the outside just to the middle of the circle
    • Roll it together to make a cone shape and tape it together
    • Then tape the cone onto the yellow paper.
  • Put whatever you want inside the pencil: candy, snacks, supplies, notes, puzzle pieces, etc.
  • Cut out a pink circle the same size as the pencil and tape it on the end of the eraser to seal the surprises inside.


Since I knew I was going to use the Pencil Pouches as goodie bags, I decided to use this paper pencil as part of our Family Home Evening lesson.

With the start of the new school year we decided to talk about being happy and smiling. I looked in a couple magazines and cut out a bunch of pictures of kids smiling. I taped them (double stick tape) to construction paper and placed them inside the paper pencil. 


So after we sang our song and said our prayer we had our lesson:

We talked about what makes us smile.
We talked about how smiling can help us and those around us to feel good.
We talked about how thinking about the good things we have can help us to smile and be happy.
We talked about why Heavenly Father wants us to be happy and what He has blessed us with so we can smile.
We also talked about how sometimes we are sad and don't want to smile.
But that when we help others, and think about all the wonderful things about our lives, we can be happy again.
:)

Back to School Pencil Cake


I've been thinking lately about the fun of family traditions. With school starting, I wanted to find some fun traditions that we could do each year at the beginning of school, just like the one I posted about yesterday. :) (Pencil Pouches on School-year's Eve

I saw an amazingly CUTE idea of making a Back-to-School Pencil Cake on Food Network's website. (Go there for the Tutorial.)  I found it several weeks ago and have been SO excited to make it and start a fun tradition of making it at the beginning of school each year.


I made mine a little bit differently than Food Network shows.
I used a cake mix instead of buying the 2 angel food cakes.
And I cut the cake in half and put them side by side.

Everything else was pretty close to their tutorial. 

BUT I had some major problems with the following:
1.the cake -- the mix I bought was really gross actually. A huge disappointment. And the cake was crumbly and uneven...... :(
2. the frosting -- it was a little too runny. :( 
3. the chocolate -- it was SUPER runny when I went to write "Happy School year" on the cake....hence the creepy looking "H". haha 


So in the end, the cake wasn't as amazing as I'd been picturing it would be.
But oh well. The kids still LOVED it. 

I guess traditions don't have to be perfect to be fun. :)


Easy Frog Craft for Kids

Summer is in full swing....and ending all too quickly! If you're kids have any bored days where they are jumping off the walls l...